April 25, 2014

What after rooting my android device?


Ok, so one fine day in your life you heard the term root. You enquired about it. You learnt a lot from different websites. And you got inspired enough to root your device. Congratulations you've successfully rooted it too. Now what?


Here is a list of some of the must have apps which you should give it a try after rooting:


  1. Superuser
    Grant and manage superuser rights for your device.

  2. Battery calibration
    After a time of using any android device, the battery status becomes somewhat fake. As the battery is no longer as healthy as it was when it was new. The app helps you reset battery status so that you could see correct battery charging percentage.

  3. Boot animations
    Remove the time-consuming boot animations for faster shut down, starting up and reboot. Alternatively, you can customize the boot animations if you want.

  4. Boot manager
    You can prevent selected apps to run on system startup. Saves battery and time.

  5. Call master
    It is an advanced call, sms and mms blocker with unique privacy features.

  6. ES file explorer
    It is a free, full-featured file and app manager.

  7. Font installer
    Select from hundreds of custom fonts to install system wide. Preview, backup, install from SD card and share your fonts.

  8. Greenify
    Never should your phone or tablet become slower and battery hungrier after lots of apps installed. It hibernates selected apps.

  9. Kernel tuner
    It is a tool for root users to completely customize their device behaviour. This is the only application that offers full multi-core control over their devices. It allows users to control each core of their devices independently.

  10. SD booster
    SD-Booster speeds up your external and internal SD-Card(s) and SD-Memory up to 40 times! (its true)

  11. Terminal emulator
    Engineering student? UNIX in syllabus? Access your android's built-in linux command line shell.

  12. Titanium backup
    You can backup and restore your apps + data + Market links. This includes all protected apps & system apps, plus external data on your SD card.

  13. Webkey
    Using this program you can control your phone from any browser.

  14. WiFi Credentials Recovery
    This tool will discover all protected WiFi network's passwords that your device was connected to. If you forgot your WiFi network password and you were already connected to the network,this tool will discover the password.

  15. Wifikill
    With this app you can disable internet connection for a device on the same network.


Steps to root Samsung Galaxy Tab 2 7.0 GT-P3100


Please ensure your important files and apps are backed up and you have sufficient battery.


  1. Download and install USB Drivers on your pc.
  2. Go to menu > settings > applications > Development option> enable USB debugging mode.

  3. Download cf-root and odin and extract them.
  4. Turn off your tab. Press and hold volume down and power buttons together. A warning message will appear on the screen, press volume down button. You'll enter into download mode.

  5. Right click on file odin3 v3.07.exe > run as administrator.
  6. Plug in the USB cable to the tab to connect it with the computer while tab is in the download mode.

  7. Wait for some time until odin detects the tab. When connected successfully, the id: com box will turn blue with the com port number. Also, successful connection will be indicated by an added message in odin.
  8. In odin, click the pda button and select cf-auto-root-espressorf-espressorfxx-gtp3100.tar.md5 file.

  9. Ensure the auto reboot and f.reset time checkboxes are selected in odin. But uncheck the re-partition option.
  10. Click the start button in odin to begin installation.

Once the flashing process is completed, the tab will restart automatically. And soon a pass message with green background will appear in the extreme-left box at the top of odin. When then home screen is seen on the tab's screen, unplug the USB cable from the tablet to disconnect it from the computer . Caution: rooting will void your device's warranty and the process might brick your device.

Samsung Galaxy Tab 2 7.0 running on Android 4.1.2 Jelly Bean official firmware should be now rooted successfully. Users may now install any app that requires root permission.

April 22, 2014

किनारे..


ढूंढे हर इक सांस में
डुबकियों के बाद में
हर भंवर के पास. किनारे..

We have searched in every breath
After having a dip
Near every storm. Shores..


बह रहे जो साथ में
जो हुमारे खास थे
कर गये अपनी बात. किनारे..

The ones who were flowing with us
The ones who were special for us
They said what they had to, and went to the. Shores..


गर माझी सारे साथ में.. गैर हो भी जायें
तो खुद ही तो पतवार बन.. पार होंगे हम

Even if all the boatmen together.. become strangers to us
Then we will become paddles ourselves.. and cross on our own


जो छोटी सी हर इक नहर.. सागर बन भी जाये
कोई तिनका ले के हाथ में.. ढूंढ लेंगे हम. किनारे..

Even if every small canal.. turns into a sea
We’ll take a straw in our hand.. and find. Shores..


खुद ही तो हैं हम. किनारे.
कैसे होंगे काम. किनारे
हैं जहाँ हैं हम. किनारे.
खुद ही तो हैं हम. किनारे.

We ourselves are. Shores.
Then how can there be less. Shores.
Wherever we are, there are. Shores.
We ourselves are. Shores.


औरों से क्या खुद ही से.. पूछ लेंगे राहें
यहीं कहीं मौजों में ही.. ढूँढ लेंगे हम

Why others, we'll ask ourselves only.. the path
We'll find it here somewhere.. in the waves only


बूँदों से ही तो हैं बनी.. बाँध लेंगे लेहेरें
पैरों तले जो भी मिले.. मान लेंगे हम. किनारे..

They're made of water only.. we'll tie the waves
Whatever comes under our feet.. we'll believe they are. Shores..

April 17, 2014

How to boot any Micromax device in Recovery mode


Simply press power button + volume down button + volume up button simulteneously :)

April 14, 2014

How to correct your mobile GPS if it’s not working


I have rooted Micromax Canvas 4 and my gps was not working. I did all possible customizations which you could possibly think of. Then I found this AWESOMEST app which fixed my all gps-related problems in like 30 seconds!! A big thanks to developer :)

Follow these steps:
  1. Go to settings.
  2. Go to location access.
  3. Check ‘access to my location’ and ‘wi-fi & mobile network location’.
  4. Turn ‘GPS satellites’ on.
  5. Now tap on the words ‘GPS satellites’ to open GPS satellites settings.
  6. Check ‘GPS EPO assistance’ and ‘A-GPS’.
  7. Turn on Wi-Fi of your device.

Now download '
GPS Status Test & Fix' app
  1. Open the app
  2. Click 'Reset GPS'
  3. Click 'Get Xtra data'
  4. Wait till GPS gets fixed (around 30 seconds)

And you're done :D As simple as that!!

April 4, 2014

Send 1GB+ file in 3 minutes or less on Android !!


It's finally here!! The app we all have been waiting for since time immortal! The title of the post is really true, I've witnessed it time and again!! I know it's hard to believe.. but this is so true!! Presenting an all new android app: SUPERBEAM !! Super new, Super fast, Super awesome!! No bluetooth, No Wifi, No Internet Connection Required whatsoever!!


How does it work ?: 

  • The app creates an ad-hoc network (wifi direct) for sharing files between devices if no Wi-Fi network is present. 
  • Install superbeam on both devices and pair them using QR/ NFS/ Code. 
  • You can even connect Superbeam to an Android device without Superbeam installed.
  • Or to a computer by connecting those computer to the ad-hoc network Superbeam creates.


April 1, 2014

How to activate hyper-v


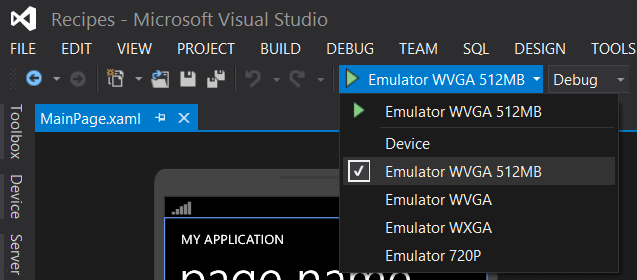
If you are a Microsoft Windows Phone App Developer, you will need either:
  • A Windows Phone
  • or, Emulator
to test and run your app. If you've a windows phone well and good. But if you don't then you must configure your system in order to run the emulator. 
  • If you're using a laptop, remove your laptop battery
  • Enable virtualization technology from BIOS setup
  • Turn USB 3.0 off or set it in auto mode from BIOS setup
  • Go to 'control panel'
  • Click 'Programs'
  • Click 'Turn windows features on or off'
  • Check 'Hyper-v'
After these steps, you need to reboot and you're good to go. You may reinsert the battery. Your machine is hyper-v enabled now.